This tutorial assumes you've worked through the first one, screencap manipulation.
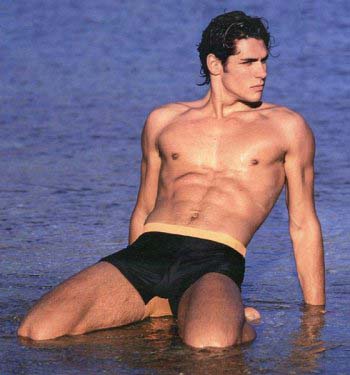
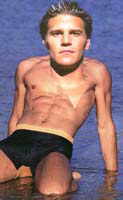
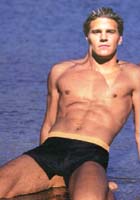
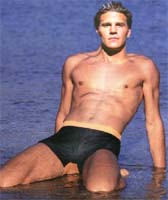
As with the screencap comosite, the first thing you need to do is find a model body that can be used for the manipulation.
I found this picture, thinking that I might use it, but the more I look at it, the more I can't see one of those bodies as Spike. Bless him, those just aren't his muscles. So, although I like the picture, I'll probably never use it. (although it did occur to me to make it an Angel/Angelus picture, but that freaked even me out).
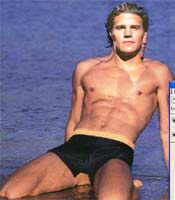
So, pick a picture that looks like the character you are going to turn it into. I'm going to turn this one into Angel.
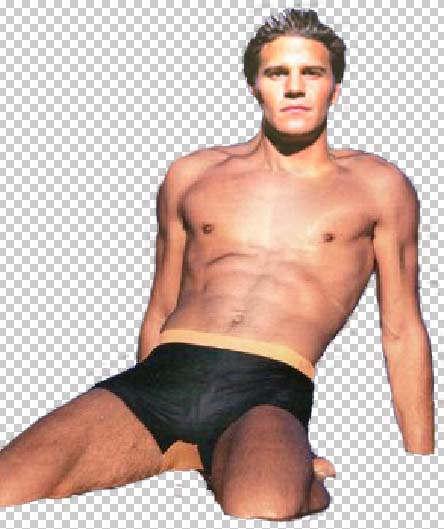
Ah, I hear you cry (well, I don't but it sounds good) he's in daylight swimming. Yes, he is... now <g>
That's the fun of the game. We're going to let him have a little midnight swim.
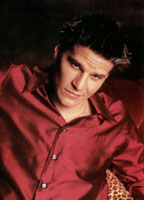
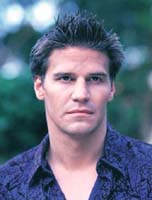
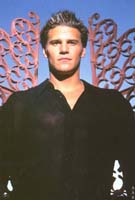
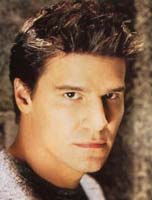
The first thing to do is to find a suitable head. Again, look at the angle of the shoulders and the distinct chords on the neck. Ideally, try to find a picture that matches the model's angles. Also, the quality of this picture is very good, a poor screencap of Angel isn't going to work very well. You really need to match these sort of pictures with promos or pictures of David (ie, not always taken in the dark).
Which one would you choose?
Think about the angle of the head, the expression you want (ie, the emotion of the picture), and to some extent, the lighting - colouring and some lighting you can fix later.
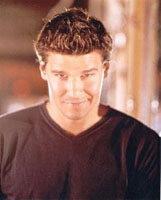
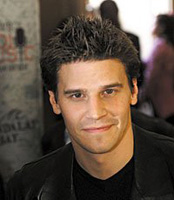
I'm going to reject the smiling ones to start with. I always feel Angel should be gloomy (unless he's doing something particularly interesting with Spike, then I allow him a small, satisfied smile).
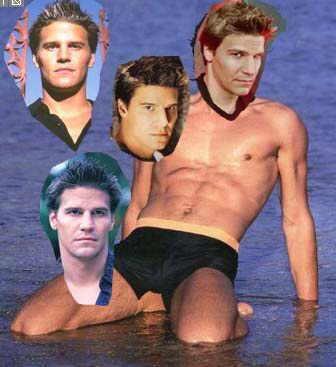
When you've got down to a few favourites, copy, paste and scale them into the model's photograph.
Then you have a really good preview of what the finished photo will look like. Each one will go onto a new layer and you can turn each off in turn and look at them in place.
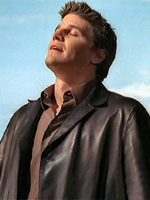
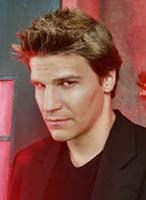
I like the one with the gates in the background. Not only is the colouring almost perfect and it's shot in good light, it actually has that arrogant, challenging look to it that could make you think the picture was either Angel or Angelus.
In the previous screencap tutorial, I captured the head by masking it off and copying it. This time, I want to demonstrate the new PS 7 feature of 'Extract'. If you don't have PS 7, just use the technique I described in the previous tutorial. I've done all the manips on my site with it, so it still works well.
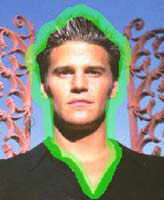
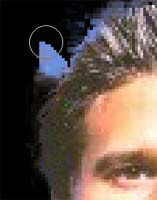
When you have the source photo, click on filter and extract. The photo comes up in a new window. You will see a pallet of tools as shown opposite. Red is the highlighter, blue the fill, green the touchup pen and yellow the edge pen.
With the highligher tool, draw around the edge of the selection you want to make... ie, David's head and neck. The line should be thick enough to cover all the sticky up hair with one third and two thirds of the line over the background.
Then click on fill and click in the middle of the picture.
Click preview. This will show you what you will extract. The touchup pen will remove stray areas of background, or if you hold down alt and use it, put opacity back into the picture where you've lost it.
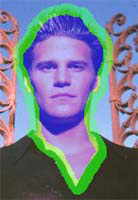
In the final picture I did a deliberately bad extraction to show you the spare background and the touchup brush sitting over the blue pixels. Work your way around the edge of your picture with touch up and re-edge until you are happy with it.
The more you work with pictures of Angel, the more you have to agree with Spike that there is something really funny going on with his hair! You're never going to get it perfect, but extraction takes some of the work out of the old method of masking and doing individual pixel pick-outs of the spikes.
To move around the window, by the way, click on the grab hand at the bottom of the tool bar. I find this really irritating, but maybe that's just me.
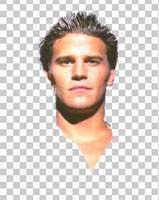
When you are happy, click ok and the selection will appear back on the main photoshop screen in a layer of its own. Ctrl-click the layer to select it and copy and paste it in the model photograph.
Oh, that's nice, isn't it? I could be really bitchy and say I've seen manips like that on some sites...
Obviously, you have to scale the head to fit. Again, reduce its opacity so you can see the model's head beneath. Pick something like earlobe to chin dimension, or eye pupil to eye pupil (don't the FBI use these to identify people?) and scale David until you are happy with the match.
I won't worry too much at this stage because you keep the head on a separate layer and when the model's head has been taken out and David's neck joined, you can always tinker with the scale more then.
The next stage is to remove the model's visible hair or head (am I the only one who thinks this is a shame? He is kinda cute... <g>)
Click on the background to make it active, and clone the sea over the visible hair.
I used to make the mistake of cloning out the whole head, even the parts I couldn't see, but when I wanted to adjust the substitute head some more, I had lost the reference point of the head beneath it, so I recommend leaving it in.
Now join the neck to the body with the technique I showed in the first tutorial (rubber on low opacity and blend the layer in).
Notice I've cloned out a bit of dark shadow on the model's neck/shoulder, on the right as you look at it.
David's face has the sun directly on it, so I added a bit of highlighing to the chest and swimtrunks (and didn't I enjoy that little bit of rubbing).
Put the tool to a large soft brush (who says I can't write fem slash?) and about 10% opacity. You can always increase it a bit if you want more.
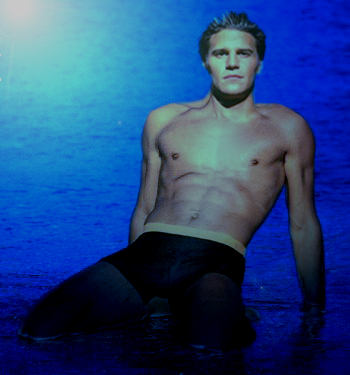
Okay, now we're going to plunge Angel into the darkness he needs!
First of all, you need to completely copy David to separate him from the sea. To do this (as currently he is separate layers), you will have to flatten the image (you can undo this in a minute with the history).
As an experiment, I did a traditional mask, selection as well as the newer version extract. Here are the results. In this case, perhaps because of the reflection from the sea, I found my old mask method better - much longer, but better.
The top one is the mask the bottom one the extract. I've left them full size, so you can see them better.
Better? I think so.
Okay... midnight swim.
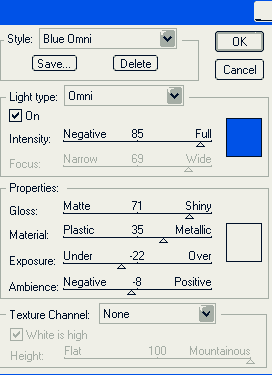
Copy the David layer then delete it. Flatten everything and put on a blue omni lighting effect.
These were the setting I used.
Paste David over the top. You may fiind that he doesn't go exactly over the other image. If this happens, lower his opacity, zoom in on something clear to see (I focused in on his nipple, but then I often do that), then click the move button and using the arrows on the key board, nudge him until the two line up. To make sure it's correct, put him back to 100% and then keep making him visible and invisible and checking that there is no movement. Correct with nudge arrows if there is.
Select him, contract him 2 pixels and blur the edge and then bring down his opacity until he looks good against the sea. I've gone for 66%.
Go back to the bottom layer of the whole picture and put a lens flare (filter, render, lens flare) I used brightness 138% with the 105mm prime lens. Put the flare (drag it) to the very top left of the picture as if moonlight striking the sea.
I've put a 2 o'clock spotlight on the David layer coming from the same direction as the moon. Zoom up on the edges and clone some of David out slightly on the shoulders to cover up the dark lines that give away the edge. For some reason, if you clone the sea layer, it doesn't match very well, better to clone David's skin out.
Put a brightness and contrast layer over the top and take brightness to minus 41.
Finished. Does he look edible? (well, okay, yeah, he always does [except when cooing over the baby]).
If you've enjoyed this tutorial, please do let me know. If you find anything that doesn't work, or I've led you astray (as if I'd do that), let me know too. spikesno1fan@hotmail.com